So, you’re setting up Facebook/Meta ad campaigns? Great! Well, you don’t want to throw your money at the wind and hope they work, right? We didn’t think so.
You’ll want a window into the nitty gritty metrics that tell you exactly what users are doing when they come across your ads. Not only will this allow you to see what actions they’re taking, including click throughs to your website or phone calls to your business, their demographics, and more, it will also allow you to use your ad budget wisely and in a way that’s appropriate for your target audience by telling you exactly what you need to know. That’s when you’ll get the best results, after all. That window we mentioned earlier? It’s your Meta Pixel.
Creating a Meta Ads Manager Account
Before we dive into creating a Meta Pixel, you’ll have to have a Meta Ads Account. Unfortunately, this isn’t something that’s automatically created when you create a Meta Business Suite account, but it’s fairly easy and straightforward to set up if you haven’t already done so.
- From Meta Business Suite, click on Settings in the left side menu.
- On the Settings screen, click Business Assets, then Add Assets.
- From the popup, click Advertising. From the dropdown, click Ad Account.
- Click Create New Ad Account.
- Continue entering details about the new account.
- Add a name
- Add a timezone
- Add a currency
- Click Next
- Review and confirm your changes, then agree to Meta’s Terms of Service and Advertising Policies. Click Create Ad Account.
Creating a Meta Pixel
The dreaded Meta Pixel installation, here we come. It’s not as scary as it sounds, but taking one look at the code when you’re in unfamiliar territory can feel a bit overwhelming.
There are three ways we recommend installing your new Meta Pixel, but first we’re going to show you how you get it in the first place.
- From Meta Business Suite, click All Tools from the left side menu.
- From the popup, scroll down to the “Advertise” section and click Events Manager.
- Upon moving your cursor to the left side of the screen, another menu will appear. Click Connect Data Sources.
- From the popup, click Web, then Connect.
- Name the data set. Click Create.
- On the next popup, enter your website URL. Click Check, then Next.
- Since this blog focuses on installing a Meta Pixel yourself, click Do It Yourself on the next popup. Click Next.
- On the next popup, click Meta Pixel Only, then Next.

Installation Option #1: Use the Free Meta Pixel for Business WordPress Plugin
You have the option of using a partner integration to install your Meta Pixel. For WordPress, this would be the Meta Pixel for WordPress (formerly Facebook for Business) plugin. If you’re comfortable installing and configuring plugins, you can use this method.
- From your WordPress dashboard, go to Plugins then Add New.
- In the right side search bar, type Meta Pixel for WordPress. Once it pops up, click Install Now.
- Once it’s done installing, click Activate.
- You’ll be redirected to the Plugins page. Scroll down to find Meta Pixel for WordPress and click Settings.
- On the next screen, click Get Started.
- From the popup, login to the Facebook account that’s connected to your Meta Business Suite account.
- On the next popup screen, click Next.
- On the next popup screen, confirm your settings by making sure the correct Business Manager, Facebook page, Instagram profile (if applicable), Ad Account, and Meta Pixel are selected. You can change this by clicking on each one. Click Next.
- On the next popup screen, click Next to allow the plugin to manage the business extension.
- On the final popup screen, click Done.
- Back on the WordPress dashboard, check and confirm that the plugin is allowed to share its token with the site.
Installation Option #2: Install Meta Pixel Manually Using Code
- After clicking Install Code Manually, click Copy Code on the next page. Click Continue.
- From your WordPress dashboard, go to Appearance then Theme File Editor.
- From the right side of the Theme Files page, find and select the header.php file.
- Scroll through the code and find the opening <head> tag. Paste the copied Meta Pixel directly underneath. Click Update File.
- Back on Facebook, you can choose to toggle on Automatic Advanced Matching. This is not required. Click Continue.
- On the final screen, click Continue to Pixel Overview.
Installation Option #3: Install Meta Pixel Using Google Tag Manager
- After clicking Install Code Manually, click Copy Code on the next page. Click Continue.
- Login to Google Tag Manager. From the dashboard, click Tags from the left side menu. Click New near the top right.
- From the slide-in popup, name your tag something such as “Meta Pixel Configuration.”
- Click on the Tag Configuration box, then click Custom HTML from the second slide-in menu.
- Enter the copied Meta Pixel code in the blank HTML box.
- Click on the Triggering box.
- From the “Choose a Trigger” slide-in screen, click Initialization – All Pages. Save the tag.
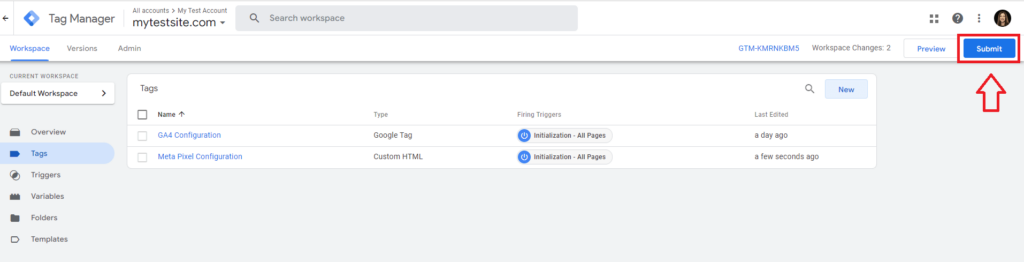
- Next, test your tag to make sure it works. Click Preview from the top right. The Tag Assistant will pop up. You’ll be prompted to enter your site’s URL. After that, click Connect.
Your website will pop up on a new screen. Back on the Tag Assistant screen, you should see that your new tag has been fired. If not, you’ll have to go back through the steps to make sure your tag was configured correctly. If your tag is firing, you’re all set. You can close your website by clicking Finish and exiting out of Tag Assistant. - Once you’ve verified that the tag is firing, Submit your changes back in Google Tag Manager. Go through the prompts to finish publishing your new tag.
Meta Pixel Installation: Conclusion
Whatever installation method you choose, the one that’s the easiest for you is the best. With that being said, plugins do have the ability to “break,” so if you’d like to avoid that potential issue in the future, we recommend installing your new Meta Pixel code manually.
If you find you still need help with installing your Meta Pixel, The Media Captain is always here to provide assistance.