Introduction to Google Analytics 4
Google Analytics 4 (GA4) is a free yet extremely powerful tool for tracking user interactions and conversion events on your website. To make the most of GA4, setting up and configuring conversion events correctly is absolutely crucial. It can be a lot to take in, but we’ll walk you through the process of setting up basic conversion events in GA4, such as form submissions, phone call clicks, and email clicks, so that you can start gaining valuable insights into your client or customer’s behavior.
Understanding Conversion Events
Not all GA4 accounts look the same, and not all conversion events are created equal. What we mean is that whatever you decide to track, they will be specific to your business and goals. Ask yourself this:
- What actions hold the most value to you when you think about users visiting your website?
- What do you want them to accomplish?
Conversion events can range from something as simple as an outbound button click to something a bit more involved, such as tracking whether or not a user completed a certain step in your checkout process. Take a look at The Media Captain’s tracked conversion events:
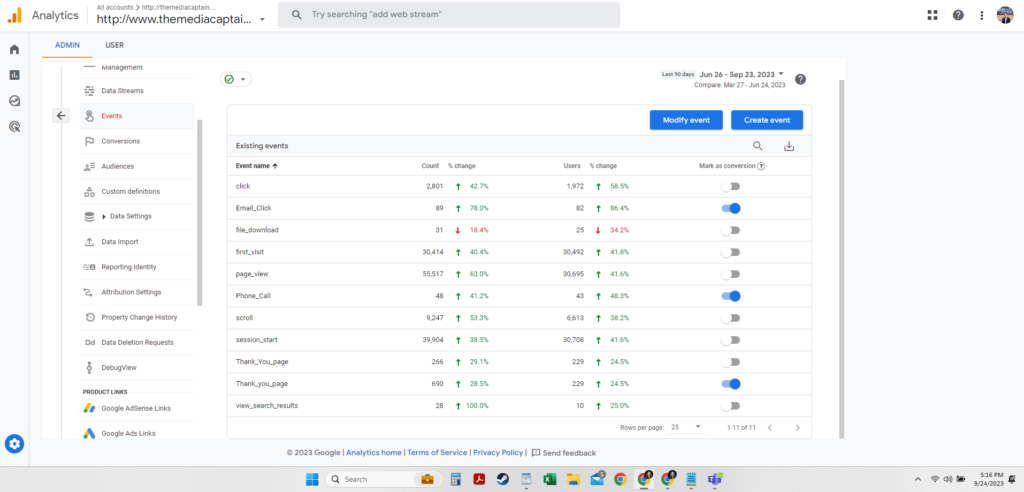
In the graphic above, you can see that we’ve set up tracking for several different conversion events, such as “thank you” page views (form submissions), phone call clicks, email clicks, and page views, among others.
Once you have a solid understanding of conversion events and have identified which would be most beneficial to track for your business, then you’ve already set the groundwork needed for effective tracking and analysis.
Setting Up Basic Conversion Events
Follow these steps to set up basic conversion events in your GA4 account. We’ll guide you through each step, from creating a new property to verifying event tracking on your website.
Step 1: Creating a GA4 Property
If you haven’t already, create a new GA4 property for your website.
- Go to Google Analytics.
- Click the Start measuring button to access the account creation page.
- On the “Create an account” screen, give your new account an easily identifiable name, such as “[Insert Business Name’s] Website.”
- In the next section, check which Data Sharing Settings you’d like on or off. Click Next.
- On the “Create a property” screen, name your property.
- Select your time zone and currency. Click Next.
- You’re halfway there! On the “Describe your business” page, select your business’s industry category and employee size. Click Next.
- On the “Choose your business objectives” page, select the topics appropriate for your business and property. Note that the last option, “Get baseline reports,” can’t be combined with the other options.
- Click Create. The Google Analytics Terms of Service Agreement will pop up. If your business is in the European Union, check the box at the bottom of the popup to also accept the Data Processing Terms as required by the GDPR. Click I Accept.
- Now we’ll need to set your website up to start collecting data. On the final screen, click Web.
- The “Set up data stream” popup will slide in from the right. Set up your data stream by inserting your URL and naming your stream. Click Create stream.
- The “Installation instructions” popup will slide in from the right. This page explains how to install your integration in two ways, which brings us to Step 2.
Step 2: Adding the Google Tag to Your Website
The next step in the process takes a bit of technical work. From the “Installation instructions” screen, you’ll see that there are two options to add the Google tracking tag to your website. Choose the one that would be easiest for you.
- Option 1: Install with a website builder or CMS
- This option details the steps needed if you’re using select platforms and/or plugins. If yours isn’t automatically detected, click Choose another to select your platform or plugin from the following options. Follow the instructions given:
- BigCommerce
- Drupal
- Duda
- GoDaddy
- WordPress MonsterInsights Plugin
- One.com
- Shopify
- WordPress Site Kit Plugin
- Squarespace
- Typo3
- Wix
- WordPress WooCommerce Plugin
- This option details the steps needed if you’re using select platforms and/or plugins. If yours isn’t automatically detected, click Choose another to select your platform or plugin from the following options. Follow the instructions given:
- Option 2: Install manually
- This option displays the code that you’ll need to copy and paste to your website’s theme file. In this example, we’re going to use WordPress.
- Login in to your WordPress website.
- From the WordPress dashboard, go to Appearance > Theme File Editor from the left side menu.
- From the right side of the Theme Files page, find and select the header.php file.
- Scroll through the code and find the opening <head> tag. Copy and paste your Google tag directly underneath.
- Click Update file.
- This option displays the code that you’ll need to copy and paste to your website’s theme file. In this example, we’re going to use WordPress.
- Bonus Option 3: Google Tag Manager
- If you’re already using Google Tag Manager, you can add your Google tag through this platform as well.
- Login in to your Google Tag Manager account.
- Click Tags from the left side menu.
- Click New near the top right.
- From the slide-in popup, give your new tag a name, such as “GA4 Configuration.”
- Click on the Tag Configuration box, then click Google Analytics from the second slide-in menu. Click Google Tag.
- Enter your tag ID. This can be found by going back to your Google Analytics account. Head to Settings then Data Streams. Click the data stream you set up previously and copy the Measurement ID on the “Web Stream Details” slide-in screen.
- Once you’ve pasted the Measurement ID back in Google Tag Manager, click on the Triggering box.
- From the “Choose a Trigger” slide-in screen, click Initialization – All Pages.
- Save the tag.
- Next, test your tag to make sure it works. Click Preview from the top right. The Tag Assistant will pop up. You’ll be prompted to enter your site’s URL. After that, click Connect.
- Your website will pop up on a new screen. Back on the Tag Assistant screen, you should see that your new tag has been fired. If not, you’ll have to go back through the steps to make sure your tag was configured correctly. If your tag is firing, you’re all set. You can close your website by clicking Finish and exiting out of Tag Assistant.
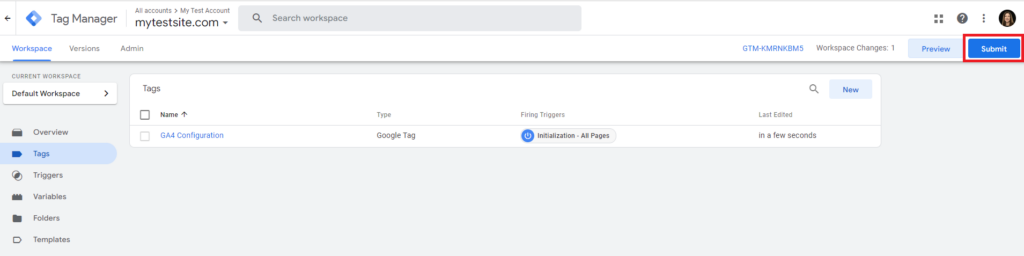
- Once you’ve verified that the tag is firing, submit your changes back in Google Tag Manager. Go through the prompts to publish your new tag.
- If you’re already using Google Tag Manager, you can add your Google tag through this platform as well.
Step 3: Defining Relevant Conversion Events
If you haven’t already, define the specific conversion events you want to track by making a list. Whether it’s a purchase, lead form submission, phone call click, or any other action of such nature, this step is absolutely essential for accurate data collection. By default, GA4 automatically tracks surface-level purchase conversion events. As a reminder, these conversion events should be specific to your business and goals.

Customizing GA4 Conversion Event Parameters
Event Names
In our example, we’re going to be setting up conversion tracking for form submissions, phone call clicks, and email clicks. If you have several phone numbers, forms, or emails to track, you’ll want to make sure each one’s name allows it to be easily identifiable in GA4 reporting. Event names for these will look something like this:
- Form Submissions:
- form_submission
- contact_form_submission
- lead_form_submission
- inquiry_form_submission
- appointment_request_form_submission
- Phone Call Clicks:
- phone_call_click
- phone_call_click_1234
- Email Clicks:
- email_click
- yourname_email_click
- coworkersname_email_click
- info_email_click
- customer_service_email_click
- Email Clicks:
- email_click
- yourname_email_click
- coworkersname_email_click
- info_email_click
- customer_service_email_click
The above examples aren’t exact. You can name them whatever you’d like. As long as you’re able to tell them apart for your own needs and keep them in a similar format, you’re good to go.
Event Parameters
Now that we know what we’re going to name our conversion events, it’s almost time to create them. Before doing so, we have to have a basic understanding of event parameters.
Event parameters are what allow you to collect specific information from specific events. For example, if you want to track a “thank you” page view upon someone submitting a form on your website, that specific page’s location, or page URL (or a portion of), will be what’s used to define that event’s specific parameter.
The Final Stretch: Setting Up Basic GA4 Conversion Events
Setting Up Form Submission Events
One of the simplest ways to set up form submission tracking is to track “thank you” page views. If you don’t already have a “thank you” page connected to your forms, it would be beneficial to create one. You can do this yourself on your website, or employ the help of a web developer if you’re not sure how to do it. We’d be more than happy to help!
To set up tracking on your “thank you” page, we’re going to head back to GA4 and go to “Settings,” then “Events.” Click “Create Event.” Bonus Tip: You can follow these exact directions to set up page view events.
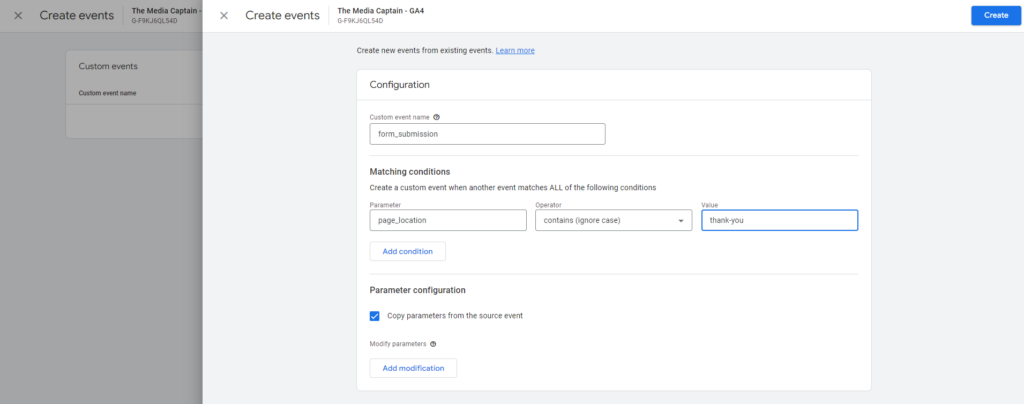
- From the “Create Events” slide-in screen, click Create. A second slide-in screen will appear.
- Enter the event name you chose for your form submission conversion event in the “Custom Event Name” field.
- In the “Matching Conditions” section, enter page_location in the “Parameter” field.
- In the “Operator” field, choose contains, contains (ignore case), ends with, or ends with (ignore case). We typically like to go with options that include (ignore case) as a way to bypass any issues that would arise from case-sensitive text from being used.
- In the “Value” field, enter the slug, or the last part of your “thank you” page’s URL. An example would be contact-thank-you. This will be dependent on your page’s own URL.
- Once you’ve filled out the fields above, it should look similar to this:
- Click Create in the top right corner.
- Head to Conversions in the property menu. Click New Conversion Event.
- From the slide-in screen, enter your new conversion event name. Click Save.
Setting Up Phone Call & Email Click Events
Setting up phone call and email clicks is very similar to setting up form submissions. We’re going to repeat most of the steps above, but change the event parameters and conditions. In order for this to work, your phone number(s) and email address(es) must be set up as links on your website.
- Phone number and email links on your website should typically look something like this:
- tel:1234567890
- tel:123-456-7890
- tel:1-234-567-8900
- mailto:[email protected]
- Once you click to create a new event, enter the event name you chose for your phone call or email click conversion event in the “Custom Event Name” field.
- In the “Matching Conditions” section, enter link_url in the “Parameter” field.
- In the “Operator” field, choose contains, contains (ignore case), ends with, or ends with (ignore case).
- In the “Value” field, either enter the last four digits of the phone number or email address you want to track, depending on which conversion event you’re setting up.
- By entering the last four digits of a phone number, we can bypass any issues that arise from phone number links that may be formatted differently throughout your website, and we can ensure analytics are pulling in for all formats that may be used.
- Click Create in the top right corner.
- Head back to Conversions in the property menu. Click New Conversion Event.
- From the slide-in screen, enter your new conversion event name. Click Save.
Test Thoroughly
Always test, test, and test some more. It should go without saying, but make sure you test your conversion events to make sure they’re pulling in correctly. You can do this by:
- Filling out your own form(s) on your website
- Clicking on your phone number on your website
- Clicking on your email address on your website
If it’s been more than 24 hours and you still haven’t seen any movement on your new conversion events in GA4, it’s time to go back through the setup process to ensure everything was set up correctly.
Common Mishaps
Event Not Tracking or Incorrect Event Data
If you find that your events aren’t tracking after 24-48 hours, or the data pulling in is very obviously deflated or inflated based on what you know about your business’s day-to-day activities, it would be good practice to go back through the steps to make sure tracking was set up correctly. Many times, issues with page view, form submission, phone call click, and email click conversion events can be easily remedied by utilizing a partial URL, phone number (such as the last four digits), or email address instead of their full counterparts, or by changing what’s in the “Operator” field. Typos are also common, so make sure everything was entered correctly.

Future GA4 Trends
Google is always working to improve their products. So much so, it almost seems as if every time we finally get used to one new change, they introduce another. The reality of digital marketing is that it’ll always be that way, whether or not we like it, so it’s best practice to get used to adapting to change, and sometimes at a fast pace.
With multiple changes in privacy and regulatory practices, Google not only continues to improve on future-proofing their products and services, but protect the privacy of their users and audiences. Universal Analytics wasn’t as privacy-safe, so we’re excited to look to the future of Google Analytics 4, conversions tracking, and its improvements as it’s been the most robust analytics platform they’ve released to date.